Activating Radio
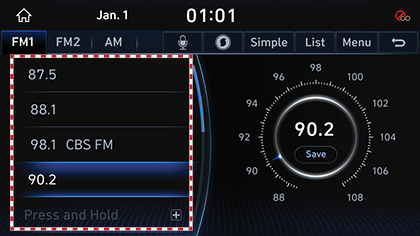
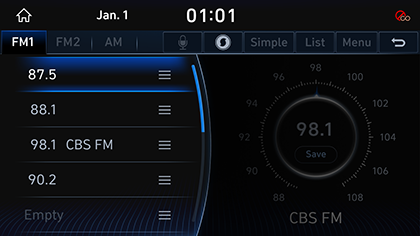
FM/AM Mode Screen Composition
|
|

|
|
|
|
1 1
Moves to HOME Screen.
2 Mode Display
Shows the mode currently in play.
3
![]()
Moves to Voice Recognition Screen.
4 Current Time
Switches to Date/Time Setting Screen.
5
![]()
Searches for the information of currently playing music.
6 Simple
Switches to Simple Mode.
7 Station List
Moves to Station List Screen.
8 Menu
Shows Radio Menu.
9 g
Moves to HOME Screen or the previous screen.
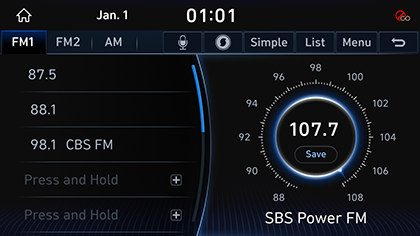
10 Frequency
Shows the frequency of currently tuned station.
11 Station name
Shows the name of currently tuned station.
12 Preset List
Shows Radio Channels saved in Preset List.
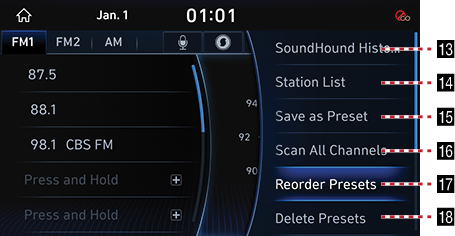
13 SoundHound History
Moves to music list screen that was recently viewed by the sound hound.
14 Station List
Moves to Station List Screen.
15 Save as Preset
Saves the current frequency in a desired Preset List.
16 Scan All Channels
Each channel of good reception is received for 5 seconds.
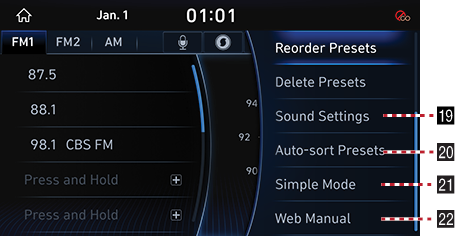
17 Reorder Presets
Changes Channels saved in Preset List in a desired sequence.
18 Delete Presets
Delete Channels saved in Preset List.
19 Sound Settings
Moves to Sound Setting Screen.
20 Auto-sort Presets
Sorts channels saved in Preset List in order.
21 Simple Mode
Switches to Simple Mode.
22 Web Manual
Displays the QR code for the manual of corresponding function.
Activating FM/AM Mode
- Press [RADIO] button on the head unit. Or press [Radio] on the Home Screen.
The last listened mode among FM1/FM2/AM plays.
- Each pressing on [RADIO] button on the head unit switches the mode in sequence of FM1 > FM2 > AM > FM1. Or press [FM1], [FM2] or [AM] on Radio Screen to select a desired mode.
- Select a radio frequency and listen to the radio.
Selecting a Radio Frequency
Manually Selecting a Frequency
Direct selection of a radio frequency is available. Frequency is Up or Down by one level (FM1, FM2: 0.1 MHz, AM: 9 KHz).
- Rotate [TUNE/FILE] button on the head unit to Left/Right to select a frequency in FM1, FM2 or AM mode.
|
|
|
,Reference |
|
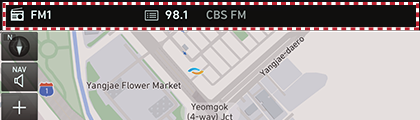
When listening the radio in FM/AM while the other screen is on, Rotating [TUNE/FILE] button on the head unit to Left/Right shows a value as in the following figure:
|
Automatically Selecting a Frequency
Automatic selection of a radio frequency is available.
In FM1, FM2 or AM mode, pressing [S SEEK/TRACK W] button on the head unit or Releasing after pressing and holding [S/W] button of Steering Wheel Remote Control tunes to stations of good receptions by increasing/decreasing the frequency.
Selecting Frequency with Preset List
Listening the radio is available by selecting a station saved in Preset List. In each mode, up to 12 stations can be saved in a Preset List.
In FM1, FM2 or AM mode, Press the Preset List (specified by the dotted lines) where the desired station is saved or press [S/W] button of Steering Wheel Remote Control to listen the desired station.
|
|
Selecting a Frequency with Voice Recognition
If you change the language displayed on the system to English, the Voice Recognition feature is not supported. Change the system language to 한국어. For more details, refer to the "Language".
- Press [
 ] button in FM1, FM2 or AM mode.
|
|
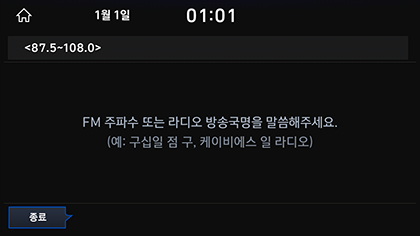
- If you hear a beep after the voice guidance, speak the desired frequency. (ex: 구십일 점 구)
Viewing Station List
May play a desired station by searching the list.
- Press [List] on the screen. Or press [Menu] > [Station List].
The list is displayed on the screen.
|
|
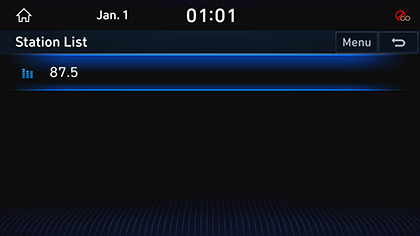
- Select a desired station from the list screen.
Saving Radio Frequency in Preset List
Saves the current frequency in a desired Preset List.
- Select a frequency desired to save on Frequency Display Screen.
|
|
_ENG_fmt.png)
- Press [Save]. Or press [Menu] > [Save as Preset].
|
|
_ENG_fmt.png)
- Select a desired Preset List. Saves the frequency in a desired Preset List.
|
|
_ENG_fmt.png)
|
,Reference |
|
The Radio Frequency saved in the previous Preset List is deleted. |
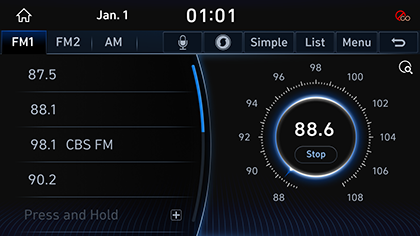
Scanning Radio Frequency
Each of frequencies of good receptions is received for 5 seconds and incremented.
Press [Menu] > [Scan All Channel] in FM1, FM2 or AM mode.
|
|
|
,Reference |
|
Pressing [Stop] during scanning, the radio of the frequency selected when the scanning stopped is played. |
Editing Preset Sequence
Changes stations saved in Preset List in a desired sequence.
- Press [Menu] > [Reorder Presets] in FM1, FM2 or AM mode.
|
|
- After Long Press a station in a Preset List and move the station into a desired Preset List.
Deleting Presets
- Press [Menu] > [Delete Presets] in FM1, FM2 or AM mode.
|
|
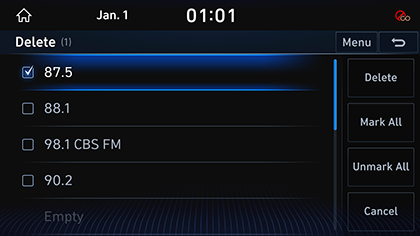
- Select the desired item, Press [Delete] > [Yes].
- [Mark All]: Selects all items.
- [Unmark All]: Unmarks all items.
- [Cancel]: Exits screen.
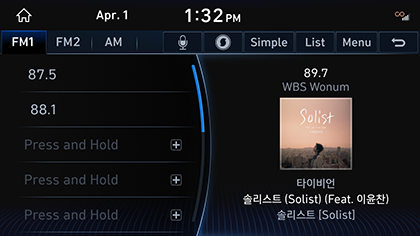
Sound Hound
Checks the information of currently playing music.
Press [![]() ] in FM1, FM2 or AM mode.
] in FM1, FM2 or AM mode.
|
|
|
,Reference |
|
To use soundhound function, you need to subscribe to the Genesis Connected services. Contact Genesis Customer Center(080-700-6000). |
SoundHound History
Checks the to music list that was recently viewed by the sound hound.
Press [Menu] > [SoundHound History] in FM1, FM2 or AM mode.
|
|
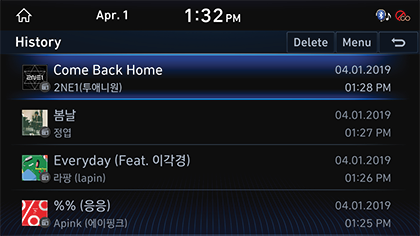
Deleting SoundHound History
- Press [Menu] > [SoundHound History] in FM1, FM2 or AM mode.
- Press [Delete].
|
|
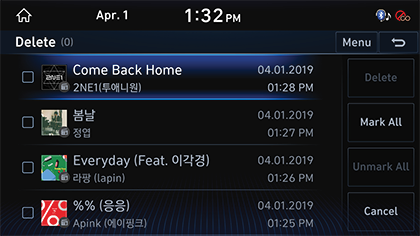
- Select the desired item, Press [Delete] > [Yes].
- [Mark All]: Selects all items.
- [Unmark All]: Unmarks all items.
- [Cancel]: Exits screen.
Simple Mode
Displays the playback screen on the entire screen.
Press [Menu] > [Simple] on Play Screen.
|
,Reference |
|
Press [Menu] > [Normal] to switch to Normal Mode. |
Sound Settings
- Press [Menu] > [Sound Settings] in FM1, FM2 or AM mode.
- For more details, refer to the "Sound Settings".