Searching for destination
Setting destination by search
Set a destination by entering the POI name, address or coordinates.
- Press [Navigation Menu] > [Search] on the home screen.
Or press [ ] on the map screen.
|
|
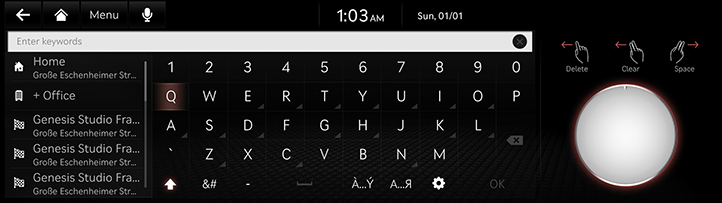
- Enter a keyword and press [OK].
|
|
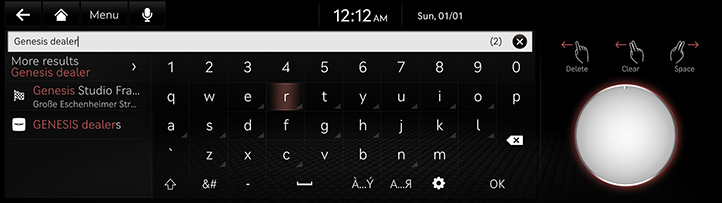
- Press the desired location and press [Set as destination].
|
|

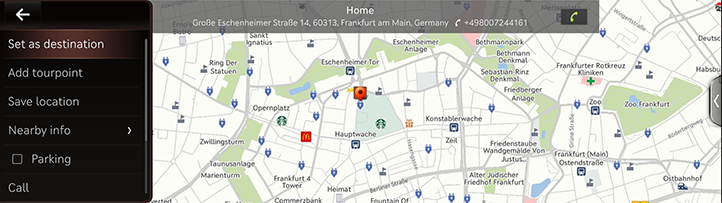
- [Add tourpoint]: Edit the route by adding a tourpoint. Available only when the destination is set.
- [Save location]: Adds the location to saved place.
- [Nearby info]: Sets the POI category to display on the map screen.
- [Parking]: Displays the parking lot around the location.
-
[Call]/[
 ]: Makes a phone call. If phone number is not saved or Bluetooth is not connected, the call is not available.
- [Display off]: Turns off the screen.
- [Web manual]: Displays the QR code for the manual of corresponding function.
- [Split screen]: Displays the split screen.
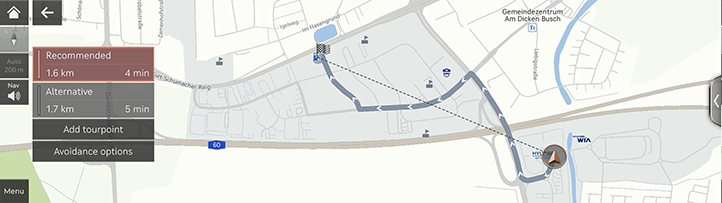
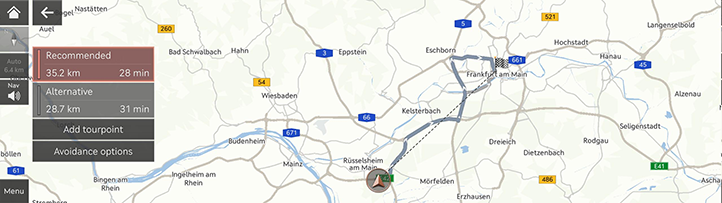
- Select the desired route.
|
|

- [Recommended]: Guides the optimal route to the destination by considering the real-time traffic information, distance and cost.
- [Alternative]: Guides the alternate route to the destination.
- [Add tourpoint]: Edit the route by adding a tourpoint.
- [Avoidance options]: Set the route options you want to avoid.
|
,Note |
|
Setting destination by previous destinations
Set the previous destination as a destination.
- Press [Navigation Menu] > [Previous destinations] on the home screen.
|
|
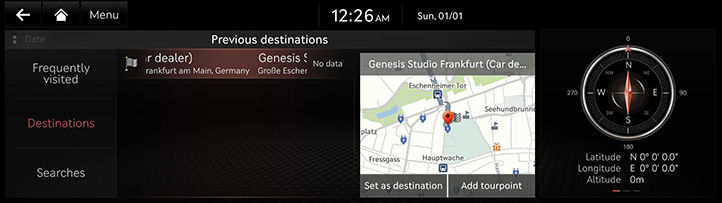
- Press the desired location and press [Set as destination].
|
|

- [Add tourpoint]: Edit the route by adding a tourpoint. Available only when the destination is set.
- [Save location]: Adds the location to saved place.
- [Nearby info]: Sets the POI category to display on the map screen.
- [Parking]: Displays the parking lot around the location.
-
[Call]/[
 ]: Makes a phone call. If phone number is not saved or Bluetooth is not connected, the call is not available.
- [Display off]: Turns off the screen.
- [Web manual]: Displays the QR code for the manual of corresponding function.
- [Split screen]: Displays the split screen.
- Select the desired route.
|
|

- [Recommended]: Guides the optimal route to the destination by considering the real-time traffic information, distance and cost.
- [Alternative]: Guides the alternate route to the destination.
- [Add tourpoint]: Edit the route by adding a tourpoint.
- [Avoidance options]: Set the route options you want to avoid.
Setting Destination by POI
Set a destination through various facility categories.
- Press [Navigation Menu] > [Nearby POI] on the home screen.
Or press [Menu] > [Nearby info] > [Nearby POI] on the map screen.
|
|
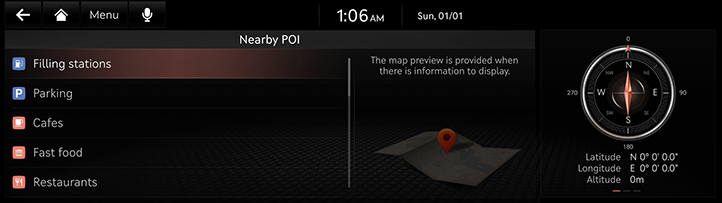
- Press the desired facility.
|
|
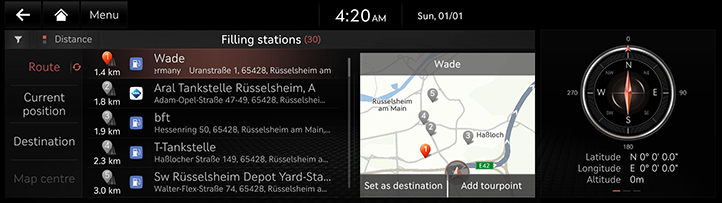
- [Route]: Searches for the facilities around the route.
- [Current position]: Searches for the facilities around the current location.
- [Destination]: Searches for the facilities around the destination or tourpoint.
- [Map centre]: Searches for the facilities around the selected location.
- Press the desired location and press [Set as destination].
|
|

- [Add tourpoint]: Edit the route by adding a tourpoint. Available only when the destination is set.
- [Save location]: Adds the location to saved place.
- [Nearby info]: Sets the POI category to display on the map screen.
- [Parking]: Displays the parking lot around the location.
-
[Call]/[
 ]: Makes a phone call. If phone number is not saved or Bluetooth is not connected, the call is not available.
- [Display off]: Turns off the screen.
- [Web manual]: Displays the QR code for the manual of corresponding function.
- [Split screen]: Displays the split screen.
- Select the desired route.
|
|
- [Recommended]: Guides the optimal route to the destination by considering the real-time traffic information, distance and cost.
- [Alternative]: Guides the alternate route to the destination.
- [Add tourpoint]: Edit the route by adding a tourpoint.
- [Avoidance options]: Set the route options you want to avoid.
Setting destination with favourites
Set the favourites as a destination.
- Press [Navigation Menu] > [Address book] on the home screen.
- Press [Favourites].
|
|
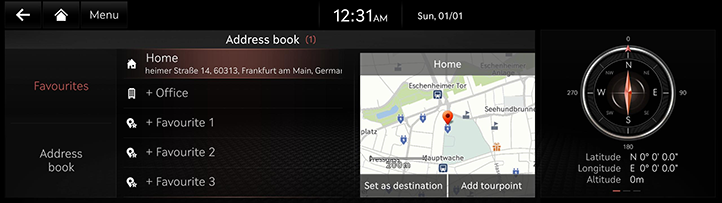
- Press the desired location and press [Set as destination].
|
|
- [Add tourpoint]: Edit the route by adding a tourpoint. Available only when the destination is set.
- [Save location]: Adds the location to saved place.
- [Nearby info]: Sets the POI category to display on the map screen.
- [Parking]: Displays the parking lot around the location.
-
[Call]/[
 ]: Makes a phone call. If phone number is not saved or Bluetooth is not connected, the call is not available.
- [Display off]: Turns off the screen.
- [Web manual]: Displays the QR code for the manual of corresponding function.
- [Split screen]: Displays the split screen.
- Select the desired route.
|
|

- [Recommended]: Guides the optimal route to the destination by considering the real-time traffic information, distance and cost.
- [Alternative]: Guides the alternate route to the destination.
- [Add tourpoint]: Edit the route by adding a tourpoint.
- [Avoidance options]: Set the route options you want to avoid.
Setting destination by Address book
Set the saved places as a destination.
- Press [Navigation Menu] > [Address book] on the home screen.
- Press [Address book].
|
|
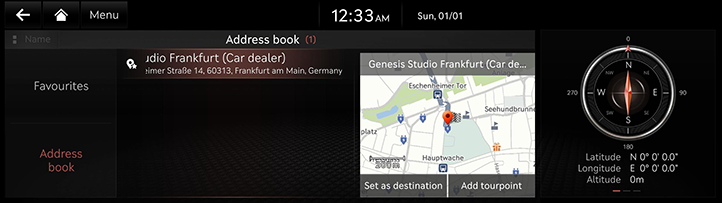
- Press the desired location and press [Set as destination].
|
|

- [Add tourpoint]: Edit the route by adding a tourpoint. Available only when the destination is set.
- [Save location]: Adds the location to saved place.
- [Nearby info]: Sets the POI category to display on the map screen.
- [Parking]: Displays the parking lot around the location.
-
[Call]/[
 ]: Makes a phone call. If phone number is not saved or Bluetooth is not connected, the call is not available.
- [Display off]: Turns off the screen.
- [Web manual]: Displays the QR code for the manual of corresponding function.
- [Split screen]: Displays the split screen.
- Select the desired route.
|
|
- [Recommended]: Guides the optimal route to the destination by considering the real-time traffic information, distance and cost.
- [Alternative]: Guides the alternate route to the destination.
- [Add tourpoint]: Edit the route by adding a tourpoint.
- [Avoidance options]: Set the route options you want to avoid.
|
,Note |
|
Press [Name] or [Date] on the screen to change the sort method. |
Adding favourites or Address book
Add [Favourites] or [Address book].
- Press [Navigation Menu] > [Address book] on the home screen.
- Press [Favourites] or [Address book].
|
|

- Press [Menu] > [Add].
- Search the place to add using various options.
- Press [Save location] or [OK].
Editing favourites or Address book
- Press [Navigation Menu] > [Address book] on the home screen.
- Press [Favourites] or [Address book].
- Press [Menu] > [Edit].
- Select and edit a desired place.
|
|
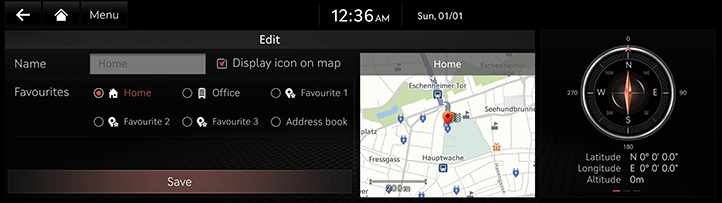
- [Name]: After editing the name, press [OK]. [Home] and [Office] cannot be changed.
- [Display icon on map]: Select to display the icon on the map.
- [Favourites]: Select a favourite group to save the place.
- Press [Save].
Deleting favourites or Address book
- Press [Navigation Menu] > [Address book] on the home screen.
- Press [Favourites] or [Address book].
- Press [Menu] > [Delete].
|
|
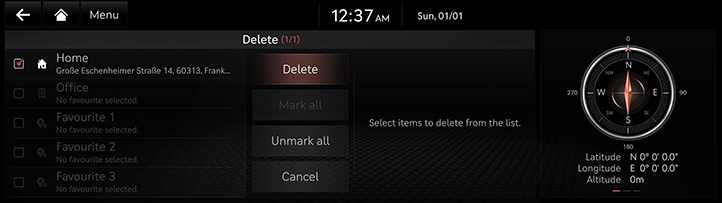
- Select the desired place and press [Delete].
- [Mark all]: Select all places.
- [Unmark all]: Unmark all places.
- [Cancel]: Returns to the previous screen.
Managing saved place
Importing saved place from USB Memory
This function is used to import saved place saved in a USB memory.
- Connect a USB memory to the USB port.
- Press [Settings] > [Navigation] > [Automated features] > [My data] > [Import favourites and previous destinations from USB] on the home screen.
- Press [Yes] > [OK].
- Press [View] to check saved place imported from USB.
Exporting saved place to USB Memory
This function is used to export saved place to a USB memory.
- Connect a USB memory to the USB port.
- Press [Settings] > [Navigation] > [Automated features] > [My data] > [Export favourites and previous destinations to USB] on the home screen.
- Press [Yes].
|
, Note |
|
Setting destination via scroll
Set a destination on the currently displayed map.
- Tap and drag the desired location on the map screen.
The selected location is displayed in the centre of the screen and a scroll mark is displayed.
|
|
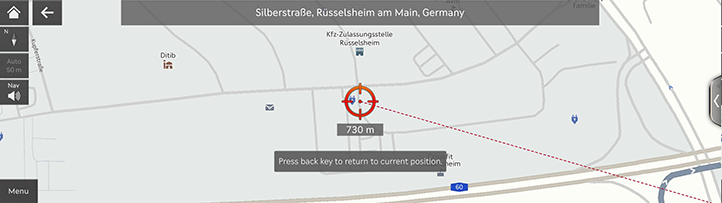
- Press [Menu] > [Set as destination].
- Select the desired route.
|
|
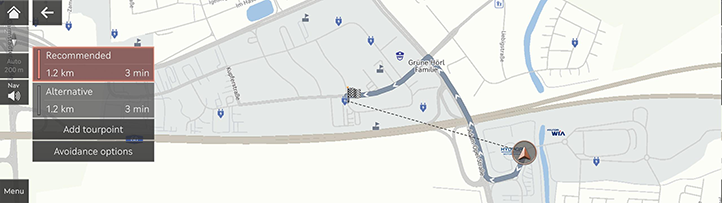
- [Recommended]: Guides the optimal route to the destination by considering the real-time traffic information, distance and cost.
- [Alternative]: Guides the alternate route to the destination.
- [Add tourpoint]: Edit the route by adding a tourpoint.
- [Avoidance options]: Set the route options you want to avoid.
|
,Note |
|