Navigation functions
Navigation Menu overview
You can use the navigation system conveniently through various functions on the Navigation Menu screen.
Perform any of the following methods:
- • On the All Menus screen, press Navigation Menu.
- • On the control panel, press the button.

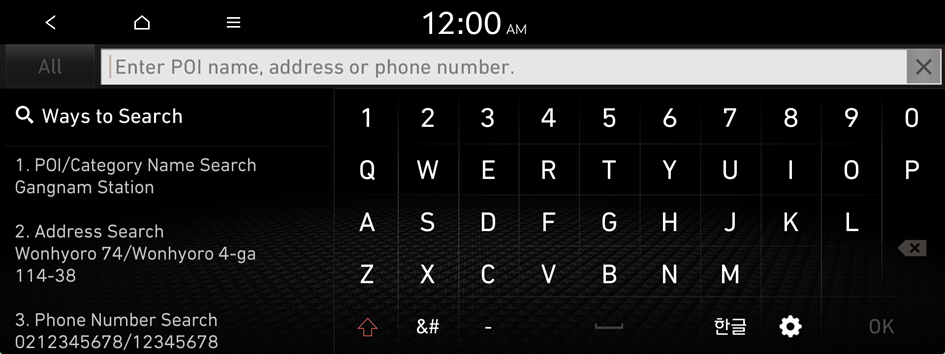
- You can set a destination by entering values for name, address, and phone number. ▶ See "Using the unified search (Places)."
- Search for POIs by category to set as a destination. ▶ See "Searching the nearby points of interest."
- Enter an address to set as a destination. ▶ See "Searching by address."
- Select any of previous destinations to set as a destination. ▶ See "Searching by previous destinations."
- Register the location or use the saved place for setting a destination. ▶ See "Using the saved place."
- You can easily search for service centers and service stations. ▶ See "Searching for service stations."
- You can cancel guidance to the destination.
- You can see the entire route information to the destination.
- You can edit the current route so that you can travel via waypoints on the way to the destination. ▶ See "Editing the route."
- You can change the route search criteria to resume routing.
- You can check notices, accident and construction zone alerts on the map. ▶ See "Viewing Accident Alerts."
- Search for scenic routes, and set one of the routes as your driving route.
- You can change the Navigation-related settings.
- You can register your home, office, or other frequently visited place as a favorite for ease of search. ▶ See "Registering a frequently visited place as a favorite place."
- The list of menu items appears.
- • Display Off: Turns off the screen. To switch the screen back on, press the screen or briefly press the power button.
- • Reorder Icons: Can change the location of an icon on the Navigation Menu screen.
- • User's Manual on Web (QR Code): Displays the QR code that provides access to the online user manual for the system.
Finding a route easily
- On the All Menus screen, press Navigation Menu ▶ Search.
- Press and hold the [ button on the control panel to enter into Places.
- Enter a name (trade name), address, phone number, and other destination information and perform a search. Select the destination from the search results.
- To see the search result for a specified area, press All and then select the desired area.
- To sort the search results in a different order, press on the attribute to toggle between options.
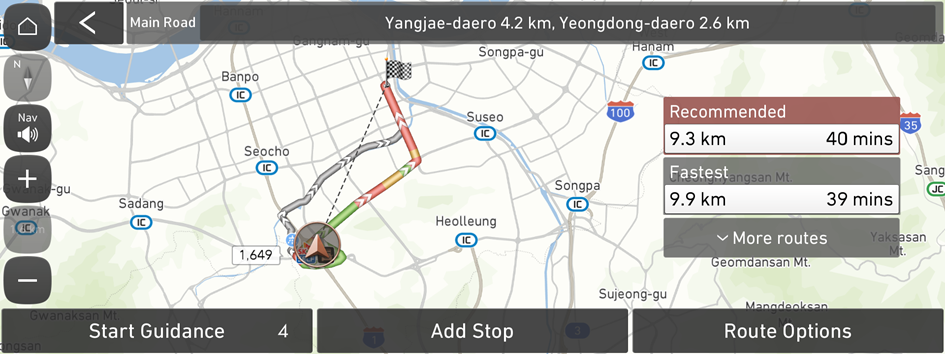
- Check the location of the destination and then press Route.
- When you see the search result list, press the desired destination to see on the map.
- Select the desired route from the searched ones and press Start Guidance.

Caution
The information on the map may differ from actual road conditions depending on the driving conditions and the location of the vehicle.
- • Digitalized roads may not be identical to the actual roads. When guidance does not match the actual route, drive the vehicle according to actual road conditions.
- • The system may provide guidance that differs from the actual route due to a change in road conditions. When guidance does not match the actual route, drive the vehicle according to road conditions with observing the traffic regulations. When the vehicle reaches a zone that matches the actual route, the system guides the route correctly.
- Vehicle location may not be displayed correctly if:
- The vehicle is driving on a Y-shaped or winding road with narrow angles.
- The vehicle is driving closely to another road.
- The vehicle is driving on a road where there are many tall buildings in the vicinity.
- The vehicle is driving on a new road or a road under construction.
- The vehicle is transported by a ferry or heavy-duty transport vehicle.
- The vehicle is driving in a rugged mountain area or on a steep curve road.
- The vehicle is entering a public road after making a turn through the turntable in an underground parking lot or multi-story parking lot.
- The vehicle stops and starts repeatedly or moves slowly in front of an intersection.
- The system reboots after the vehicle battery has been recharged or replaced.
- Navigation service may not be provided correctly under the following conditions:
- When the vehicle drives on a straight road continuously, the system may guide you to drive straight. It is not a malfunction.
- Guidance may not be followed immediately after the vehicle makes a turn at an intersection or drives through an intersection.
- The system may guide you to make a U-turn in a prohibited area.
- The system may guide you to a traffic-blocked road (e.g. no-entry road or road under construction).
- The system may guide you to a road away from the destination when there is no road to the destination or there are only narrow roads on the way.
- Guidance may not be proper when the vehicle is off the route.
- Guidance may not match the actual distance on an overpass or underpass due to the difference of the start point.
Navigation screen
The navigation screen provides various functions and information, as follows:
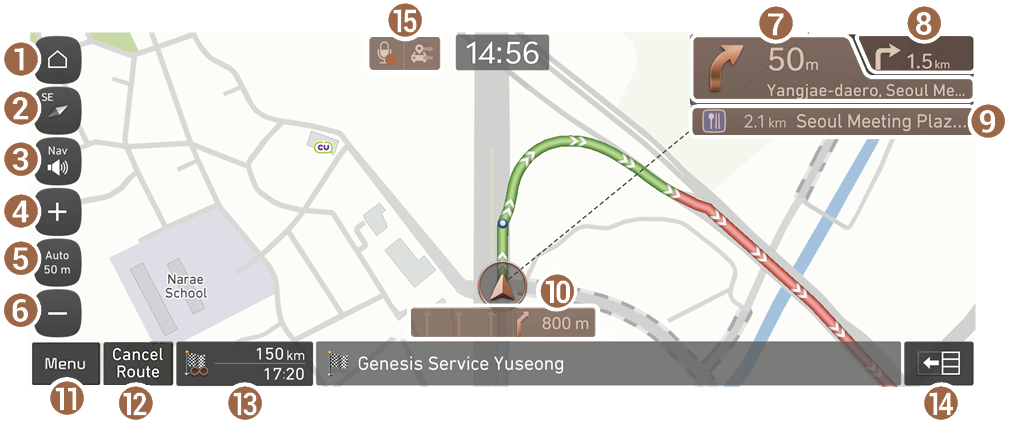
- Displays the Home screen.
- Used to change the map display mode.
- •
 (North Up 2D): Displays the map with the north fixed at the top.
 - •
 (Heading Up 2D): Rotates the map depending on the travel direction.
 - •
 (Heading Up 3D): Rotates the map depending on the travel direction for 3D view.
- •
- Adjust the navigation sound volume.
- Zooms in the map.
- The scale of the map automatically changes.
- Zooms out the map.
- Displays the point to change the driving direction.
- Displays the next point to change the driving direction.
- Displays the rest areas for drowsy drivers or service areas on the route.
- Displays the lanes in different colors.
- • Brown: Recommended lane
- • White: Available lane
- • Gray: Unavailable lane
- Displays quick menu items that can be used during guidance.
- Can stop the route guidance. ▶ See "Canceling route guidance."
- Displays the remaining distance to the destination and the estimated time of arrival. For more details, press the information item.
- Displays or hides the detailed guidance.
- You can see the system information on the navigation screen. (It can display up to two items.) To view detailed information about the system, press the status icon.
- • Wireless charging status
- • Vehicle location sharing
- • Bluetooth/phone connection status
- The system status information displayed on the navigation screen may differ depending on the vehicle model and features.
- To see only the map with no destination, press the map area on the Home screen or on the All menu screen, press Map. Or press the button on the control panel.
- When you are subscribed to the GENESIS Connected Services, you can transmit the current location of the vehicle to a third party. ▶ See "Sharing the vehicle location."
- The navigation button appears only when you press the screen. To use the button while driving, press the screen.
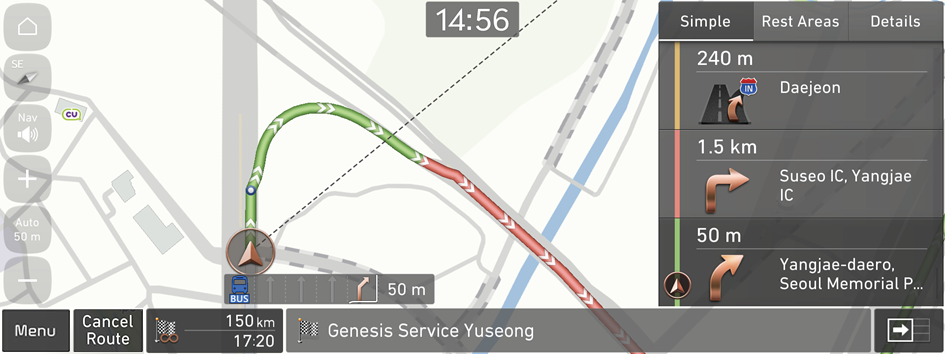
Using the detailed guidance
When the vehicle needs to change the driving direction or lanes, a zoomed-in map automatically appears.
- To display or hide the detailed guidance, press
 or
or  .
. - When the vehicle is driving on an expressway with no guidance, the list for detailed information displays the interchanges, junctions, and rest areas ahead up to 30 items.
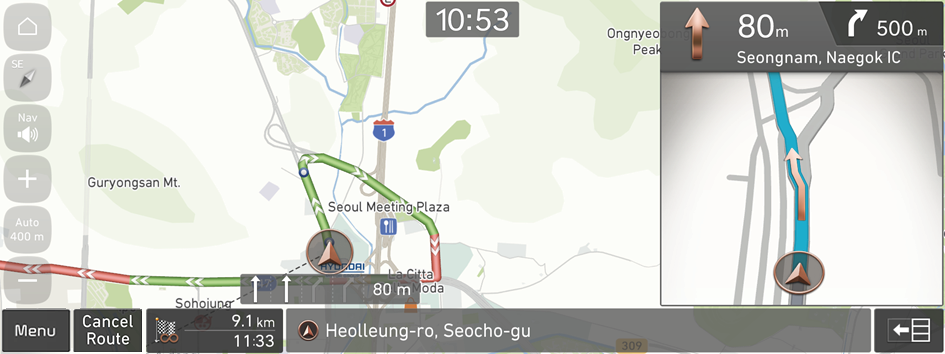
When the detailed guidance appears while driving, select and perform the desired function.
- • To check information on the zone for a turn, press Simple.
- • To check the types and locations of convenience facilities in a rest area, press Rest Areas.
- • For information details about each zone such as intersections, interchanges, and rest areas, press Details.
Viewing indoor parking lot info
When entering an indoor parking lot, it is possible to display the parking lot on the map screen to view information on the parking spaces and convenience facilities in the garage.
Checking the current location
When entering an indoor parking lot, the current vehicle position is shown as an icon on the right of the screen. If you select a different floor, the vehicle position changes to the selected floor and the map screen for the selected floor appears.
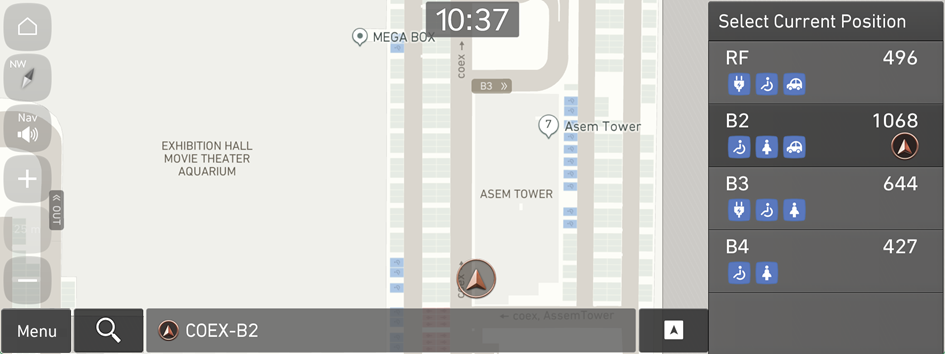
- The right side of the screen shows convenience facilities in the parking lot.
Switching to the normal map screen
- To display the normal map screen, press
 on the map screen.
- To return to the parking lot map screen, press
 on the map screen.
Adjusting the navigation volume
You can adjust the volume of the navigation or audible warning sound.
On the navigation screen, press  and then press
  or
or  , or use the control bar to adjust the volume.
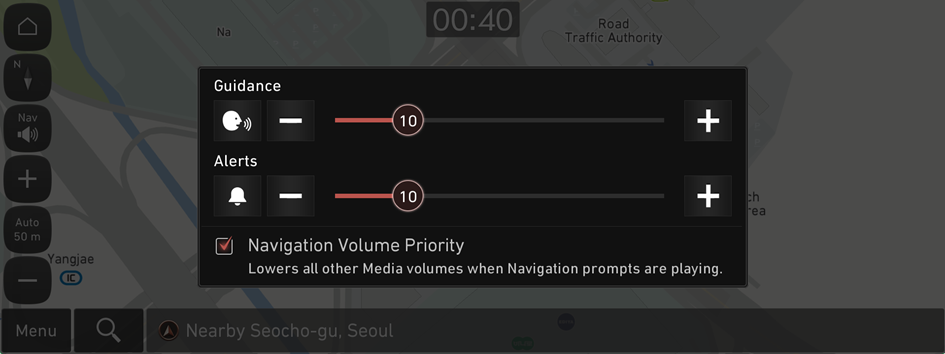
- To have the navigation sound always output first over media sound, check Navigation Volume Priority.
- To turn off the navigation voice, press and then press
 .
. - To turn off the navigation sound effects, press and then press
 .
.
Resuming routing
You can resume routing based on the traffic information update.
On the Navigation screen, press  ▶ Route ▶ Reroute.
Depending on the current traffic conditions, it resumes routing.
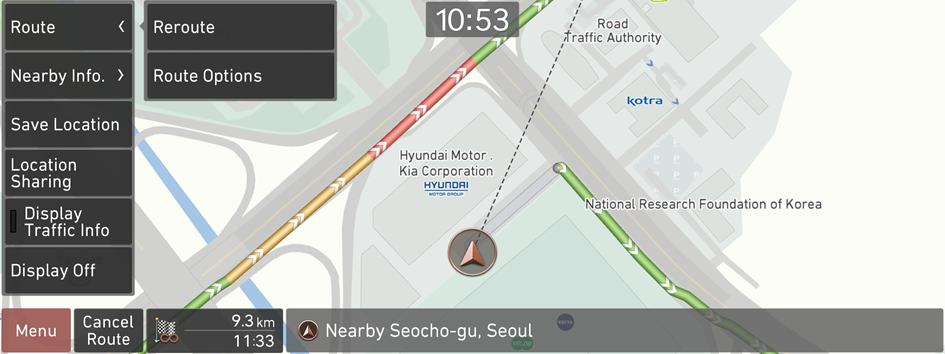
Changing the route search criteria
You can change the route search criteria to resume routing.
- On the Navigation screen, press ▶ Route ▶ Route Options.
- Select the search criteria and press Start Guidance.

- You can change the name for a route option when searching for routes or set detailed route options for each route. To set a route option, press Route Options on the Route screen.
- Available options may differ depending on the vehicle model and specifications.
Canceling route guidance
To cancel route guidance, press Cancel Route. Alternatively, press Navigation Menu ▶ Cancel Route on the All Menus screen.
The destination displayed at the bottom of the screen disappears and changes to  .
.
- Press to search for the target destination to obtain an optimum route.
- To maintain the specified destination and stop the route guidance, press and hold Cancel Route at the bottom of the screen. The guidance stops and the Resume Route button appears. You can use the button to search for a previous destination and resume route guidance.


