Activating Navigation
Starting Navigation
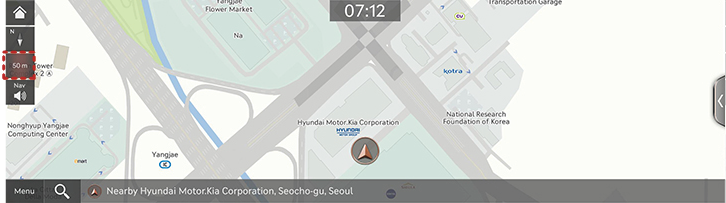
Press the [MAP] button on the head unit or press the [Map] button. The map screen opens.
Current Location Specification
Press [MAP] on the head unit while using the infotainment system specifies the current vehicle location and the map of the surrounding area.
Simple Navigation Feature
Simple navigation features are listed for easy access to frequently used features.
Moves to the simple navigation screen if you press the touchpad on front seat control key.
|
|

- [Home]: A route to the location saved as Home is advised.
- [Work]: A route to the location saved as Office is advised.
- Select Previous Destination to receive guidance on a route to the selected destination.
- [Search]: Set your destinations by entering the full name or initial, phone number, address, etc.
- [Previous Destinations]: Set a destination as [Freq. Visited Locations], [Destinations], [Searches].
- [Nearby POIs]: Search for facilities nearby by category and set them as your destination.
- [Saved Places]: Set destination as [Favorites], [Saved Places].
- [Show POI Icons on Map]: You can set the types of nearby facilities to be displayed on the map.
Changing Map View
The Map is displayed based on the vehicle direction or the North direction.
Map View change is available by pressing [ ] pop-up on the map screen.
|
|

- [North Up 2D]: Map is displayed having the top directs the North regardless the vehicle’s heading direction.
- [Heading Up 2D]: Map is displayed having the vehicle’s heading direction pointing up.
- [Heading Up 3D]: Map displays buildings in 3D.
- [Neon]: The map displays the buildings in a neon style.
- [Augment Reality]: SVM front cameras display navigation and ADAS information as augmented reality.
|
,Reference |
|
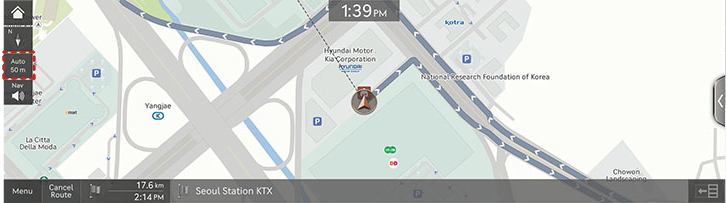
Switching Map Scale
Manually Switching Map Scale
Rotate Controller on the Front to Left/Right or zoom in/out with your finger on the map screen to change the map scale.
|
|
Automatically Switching Map Scale
The map scale can be automatically set/canceled according to the current vehicle speed.
Press [![]() ]/[
]/[![]() ] on the map screen.
] on the map screen.
|
|
- [
 ] (Auto Inactivation): Fixed scale
 - [
 ] (Auto Activation): Automatic scale (Scale changes based on the current vehicle speed)
Navigation Volume
Sets the volume of voice guidance of navigation.
- Press [
 ] on the map screen.
|
|
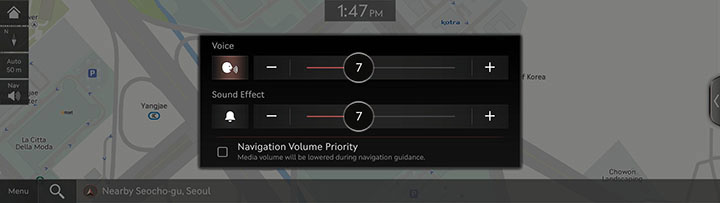
- Select a desired item.
- [
 ]/[
]/[ ]: Activate the voice and the sound effect.
 - [
 ]/[
]/[ ]: Mute the guidance voice and guidance sound effect.
 - [Navigation Volume Priority]: Sets the volume of navigation guidance louder than the audio volume.
|
,Reference |
|
When the voice and the sound effect are muted, the navigation volume button on the map screen is muted. |
Navigation Settings
- Press [Menu] > [Navigation Settings] on the map screen.
|
|
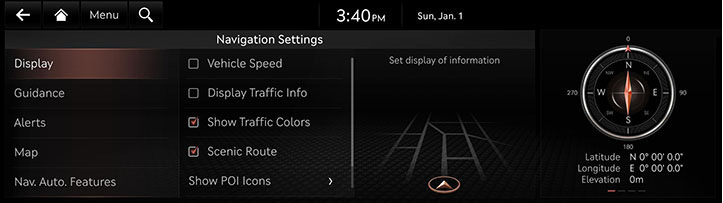
- For more details, refer to the "Navigation settings".
Location Sharing
The location information can be shared for a set time period to another person by entering his/her phone number.
- Press [Menu] > [Location Sharing] on the map screen.
- For more details, refer to the "Location Sharing".
|
,Reference |
|
Setting Previous Destinations/Frequently Visited Points
When the navigation starts, Popup display of previous and frequent destinations automatically opens for approx. 10 seconds. During the opening, pressing a destination and selecting a desired route start the guidance. Available only when no route is set.
|
|

- [Previous Destinations]: Shows previous destinations.
- [Frequently Visited Points]: Shows frequently visited destinations.
- Check the box “Deactivate this pop-up” to stop the popup of previous destinations. This function can also be set in the Navigation Settings under [Nav. Auto. Features] > [Previous Destinations] > [Display Previous Destinations when entering the Map screen].
Registering Location
The current vehicle locations can be registered.
- Press [Menu] > [Save] on the map screen.
|
|
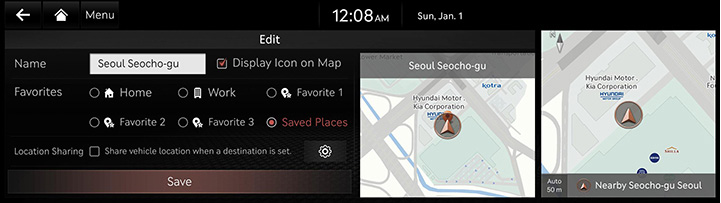
- Press a desired item.
- [Name]: After editing the name, Press [OK].
- [Display Icon on Map]: Sets a symbol to specify on the map screen.
- [Favorites]: Changes the address book.
- [Location Sharing]: Sets the location sharing.
- Press [Save].
|
,Reference |
|
Press [Menu] > [Destination] > [Saved Places] > [Saved Places]/[Favorites] to check the registered location. |
POI
Setting POI Display
Sets to display the POI Category on the map screen.
- Press [Menu] > [Nearby Info.] > [Show POI Icons on Map] on the map screen.
|
|

- Select a facility to mark on the map screen.
|
|

Searches POI Categories
- Press [Menu] > [Nearby Info.] > [Nearby POIs] on the map screen.
|
|

- Select a desired items.
|
|

- Select a desired items.
- [Route]: Facility search in neighboring area of route.
- [Current Position]: Facility search in neighboring area of the current vehicle location.
- [Destination]: Facility search in neighboring area of destination or waypoint.
- [Map Center]: Facility search in neighboring area of selected location.
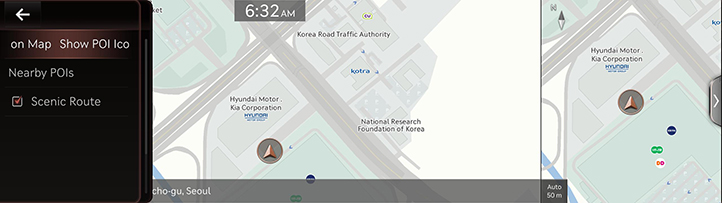
Searching Scenic Route
- Press [Menu] > [Nearby Info.] > [POI Categories] on the map screen.
|
|

- Press [Scenic route].
|
|

- [All]: Displays all scenic route.
- [Current Position]: Displays the scenic route in neighboring area of the current vehicle location.
- [Destination]: Displays the scenic route in neighboring area of destination.
- [Favorite Course]: Displays the favorite scenic route.
- [
 ]: Saves the scenic route as a [Favorite Course].
Setting Scenic Route
Check the box [Menu] > [Nearby Info.] > [Scenic Route] on the map screen.
|
|
Home, Work, Favorites
Home, Work or a frequently visited location can be saved/edited in or deleted from favorites.
Saving Favorite Places
- Press [Menu] > [Destination] > [Saved Places] > [Favorites] on the map screen.
- Press a desired item.
|
|
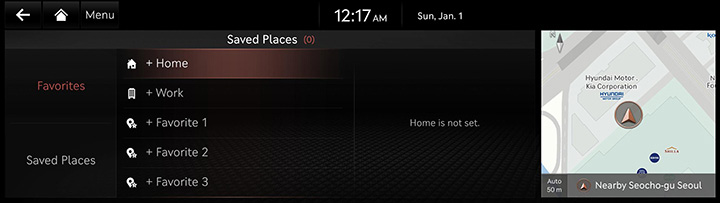
- Use search menu to set [Home], [Work], [Favorite 1], [Favorite 2] or [Favorite 3].
|
|

- When setting is completed, press [OK].
|
,Reference |
|
Editing Favorite Places
- Press [Menu] > [Destination] > [Saved Places] > [Favorites] > [Menu] > [Edit] on the map screen.
- Select an item to edit.
|
|
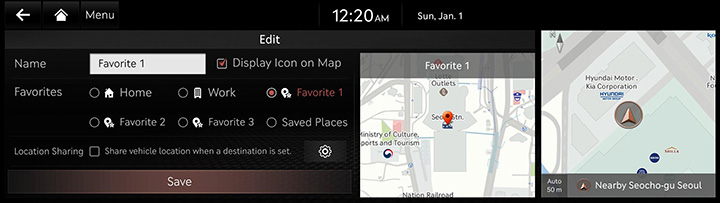
- Select and edit a desired item.
- [Name]: After editing the name, Press [OK].
- [Display Icon on Map]: Sets a symbol to specify on the map screen.
- [Favorites]: Changes the address book.
- [Location Sharing]: Sets the location sharing.
- Press [Save].
Deleting Favorite Places
- Press [Menu] > [Destination] > [Saved Places] > [Favorites] > [Menu] > [Delete] on the map screen.
|
|
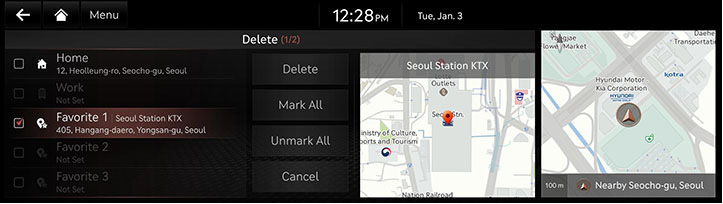
- Select the desired item, Press [Delete].
- [Mark All]: Selects all items.
- [Unmark All]: Unmarks all items.
- [Cancel]: Exits screen.
Saving/Editing/Deleting My places
Saving a interested location enables convenient setting of destinations and editing/deleting registered locations.
Saving My places
Saves frequently visited locations.
- Press [Menu] > [Destination] > [Saved Places] on the map screen.
- Press [Saved Places] on address book screen.
- Press [Menu] > [Add].
- Set a desired location by using search menu.
|
|

- When setting is completed, press [OK].
|
|

- When editing screen is done, press [Save].
|
,Reference |
|
Reference "Setting Destinations by Address Book" to set a registered location as a destination. |
Editing Registered My places
- Press [Menu] > [Destination] > [Saved Places] on the map screen.
- Press [Saved Places] on address book screen.
- Press [Menu] > [Edit].
- Select an item to edit.
|
|

- Select and Edit a desired item.
- [Name]: After editing the name, Press [OK].
- [Display Icon on Map]: Sets a symbol to specify on the map screen.
- [Favorites]: Changes the address book.
- [Location Sharing]: Sets the location sharing.
- Press [Save].
Sorting Registered My places
- Press [Menu] > [Destination] > [Saved Places] on the map screen.
- Press [Saved Places] on address book screen.
|
|

- Press [Menu] > [Name] or [Date] to sort the list.
- [Name]: Locations are sorted in alphabetical order.
- [Date]: Locations are sorted in date order.
Deleting Registered My places
- Press [Menu] > [Destination] > [Saved Places] on the map screen.
- Press [Saved Places] on address book screen.
- Press [Menu] > [Delete].
|
|
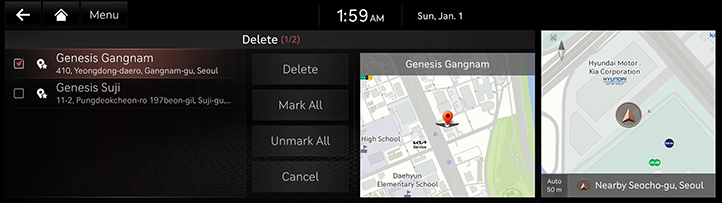
- Select the desired item, Press [Delete].
- [Mark All]: Selects all items.
- [Unmark All]: Unmarks all items.
- [Cancel]: Exits screen.
Managing address book
Importing Address Book/Previous Destinations from USB Memory
This feature is used to import address book saved in a USB memory.
- Connect a USB Memory to the USB port.
- Press [Setup] > [Navigation] > [Nav. Auto. Features] > [User Data] > [Import Favorites and Previous Destinations from USB] on the home screen.
- Press [Yes].
- Press [OK]. Press [View] to check the imported registered location.
Exporting Address Book/Previous Destinations to USB Memory
This feature is used to export address book to a USB memory.
- Connect a USB Memory to the USB port.
- Press [Setup] > [Navigation] > [Nav. Auto. Features] > [User Data] > [Export Favorites and Previous Destinations to USB] on the home screen.
- Press [Yes].
|
,Reference |
|