Name of each component
Head Unit
The image of this product may be different from the actual product.
|
|

1 MAP button
- Moves to the map screen showing the current position of the vehicle.
- When the destination is set, the voice navigation starts on the map screen.
2 NAV button
- Moves to the navigation menu screen.
- Press and hold to move to the destination search screen.
3 RADIO button
- Activates radio mode.
- Press to change the radio mode.
- Press and hold to move to the media menu screen.
4 MEDIA button
- Press to switch between the media menu screen and the media playback screen.
- Press and hold to move to the media menu screen.
5 A SEEK/TRACK D button
- When it is pressed shortly
- Radio mode: Plays the previous or next channel.
- Media/Voice memo (If equipped) mode: Plays the previous or next file.
- When it is pressed and held
- Radio mode: Changes the frequency until the button is released, then plays the frequency when released.
- Media/Voice memo (If equipped) mode: Rewinds or fast-forwards the file.
6 K (Custom) button
- User may select and use a desired feature with this button.
- Press and hold to move to the custom button settings screen.
7 SETUP button
- Moves to the settings screen.
- Press and hold to move to the general settings screen.
Front seat control key
The image of this product may be different from the actual product.
|
|
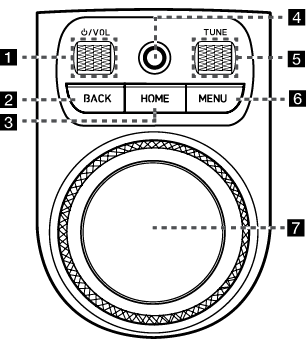
1 :/VOL (Power/Volume) button
- Press to turn AV on/off.
- Press and hold to turn on or off the display and the sound.
- Turns the wheel up/down to adjust the volume.
2 BACK button
- Press to move to the previous screen.
- Press and hold to move to the home screen.
3 HOME button
- Press to move to the home screen.
- Press and hold to move to the map screen.
4 Finger scan sensor
Use sensor to select the user profile or convenience features, etc.
5 TUNE/FILE button
- SXM mode: Turns the wheel up/down to search for channels. Press the wheel to select a channel.
- Radio mode: Selects a radio station.
- Media/Voice memo (If equipped) mode: Turns the wheel up/down to search for files. Press the wheel to select a file.
- Navigation: Turn up/down to change the map scale on the map screen.
6 MENU button
Press to display a pop-up menu for each mode.
7 Controller
- Use controller to move and select the menu as well as handwriting input.
- Use controller to change the map scale on the map screen.
Steering wheel remote control (Right)
The image of this product may be different from the actual product.
|
|
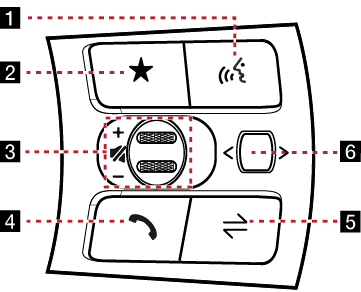
1 i (Voice recognition) button
Press to activate voice recognition.
2 L (Custom) button
- User may select and use a desired feature with this button.
- Press and hold to move to the custom button settings screen.
3 J / I (Tumbler) button
Turns the tumbler up/down to adjust the volume.
f (Mute) button
Press the tumbler to turn mute on/off.
4
 (Bluetooth call) button
- When there is no connected Bluetooth device, search for connectable Bluetooth devices and connect or add a new device.
- When connected to a Bluetooth device,
- To move to the call history screen, press the button briefly.
- To dial the last phone number of a connected Bluetooth device, press and hold the button.
5 MODE button
- Press to select the media mode to play.
- Press and hold to move to the mode button settings screen.
6 Optical touch pad
(You can use AVN control if the search mode in the cluster widget of the cluster is not.)
- When it is swiped
- Radio mode: Moves to the previous or next frequency saved.
- Media/Voice memo (If equipped) mode: Plays the previous or next file.
- When it is dragged
- Radio mode: Changes the frequency until you lift your finger, and then search for the frequency.
- Media/Voice memo (If equipped) mode: Rewinds or fast-forwards the file. (Except for the mode of sounds of nature)
|
,Note |
|
Check how to operate the optical touch pad.
|
Steering wheel remote control (Left)
The image of this product may be different from the actual product.
|
|
1 Custom button
- User may select and use a desired feature with this button.
- Press and hold to move to the custom button settings screen.
2 button
For details, refer to the vehicle instruction manual.
3 Tumbler button
Press or turn up/down the button to change the gauge style and view mode displayed on the cluster screen.